Learn
When it comes to purchasing and collecting NFTs such as the NFT Tax Guide you will need to buy and send Ethereum to a software wallet that can connect to marketplaces and blockchain applications. MetaMask is one of the most popular software wallets available and has more than 10 million users! Created to allow users to securely store crypto and interact with blockchain applications, Metamask’s browser extension creates a seamless experience for people to interact with the blockchain.
Whether you’re transitioning away from centralized exchanges or just interested in buying your first NFT, this step-by-step guide will help you set up your MetaMask wallet and purchase the NFT Tax Guide.
Download and Install MetaMask
We recommend using Metamask on your desktop with browsers such as Google Chrome, Firefox, Brave, or Microsoft Edge (Safari is not an option). Begin by visiting the MetaMask website, where you will find instructions on how to download and install a wallet.
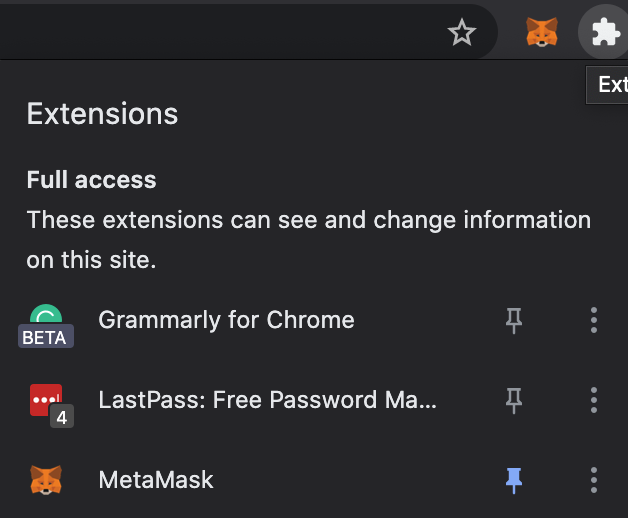
Once downloaded and installed, you will want to pin the extension to your toolbar. Look for a puzzle piece icon in the upper right corner of your browser - click it and a drop-down menu will appear. Find the icon of an orange fox, and click the adjacent thumbtack to pin Metamask to your toolbar.
Now that MetaMask is pinned to your toolbar, click on the fox icon and you’ll arrive at the first selection screen. Assuming this is your first time setting up a Metamask wallet, you’ll want to start by clicking “Create a Wallet”.
Create a Wallet
Once you’ve selected the option to create a new wallet, you’ll be asked to agree to — or opt-out of — MetaMask’s usage data gathering. You can always opt-out later in your wallet settings.
Next, you’ll get a prompt to create a password. You’ll use this password to sign in to your wallet as you would any other account. Although this is not your private key or seed phrase, you’ll want to save it in a safe place, just as you would with any other password.
The next step involves your seed phrase — or your “secret backup phrase”. The seed phrase is a randomly generated string of 12-24 words that we recommend you write down on a piece of paper, store it somewhere safe, and never share with anyone! Write it down on a piece of paper and continue.
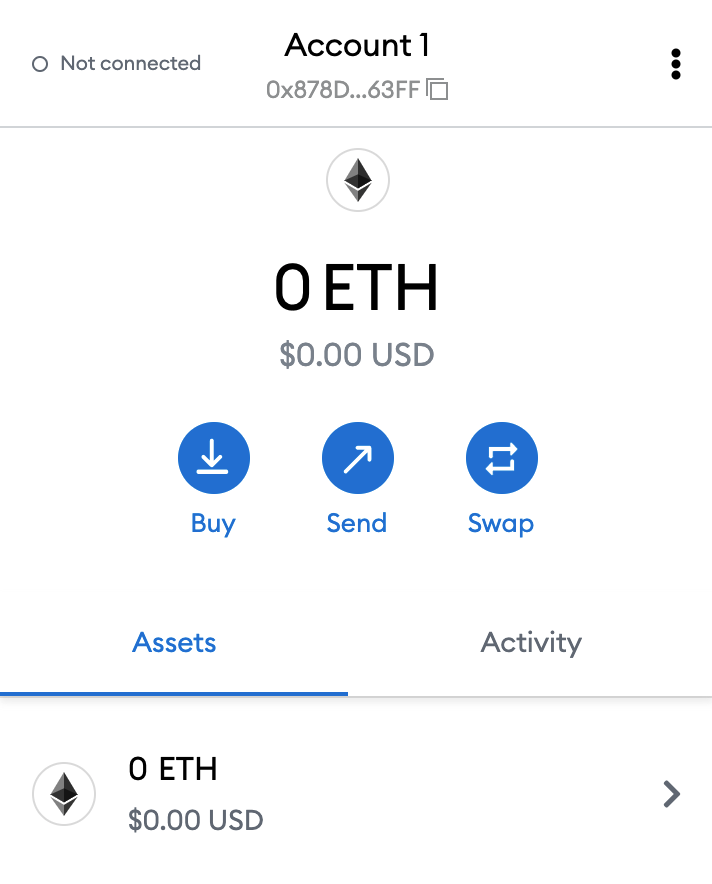
On the following page, you will be required to resubmit the seed phrase by entering the sequence of words in the original chronological order that you wrote down. Once confirmed, Congratulations! You’ve successfully set up your software wallet and your MetaMask should look like the image below.
Understanding the User Interface
Take a moment to explore and configure your new wallet. This may seem like an arbitrary step to some, but familiarizing yourself with MetaMask’s settings and interfaces can be a big help should you ever run into any trouble.
Your wallet’s unique public address is listed directly below the “Account 1” heading. A wallet address is a random string of characters that can be used to identify your wallet and receive crypto from others or yourself. Every wallet address is public, safe to share with others, and searchable via blockchain explorers like Etherscan.io.
Just because you can see someone’s wallet address does not mean you have control over the tokens inside. While anyone can send tokens to a wallet address, only the user who has the private key or seed phrase can manage and utilize the tokens within it.
Add Funds
The two most common ways to add a token to your MetaMask wallet are by either:
-
Buying and withdrawing tokens from an exchange (Coinbase, Gemini, etc.), or
-
Purchasing Ethereum directly through Wyre, Metamasks default payment interface.
Note: The NFT Tax Guide costs 0.08 ETH so please make sure you fund your wallet accordingly.
Sending Tokens From an Exchange to Metamask
Create an account on an exchange such as Coinbase, Kraken, or Gemini to buy Ethereum. Use your bank account to purchase Ethereum because it gives you access to your Ethereum immediately, whereas if you were to use a credit card, you may have to wait for 3-5 days to withdraw the Ethereum to your Metamask.
Once you have access to your tokens, open your Ethereum holdings on the exchange and choose the ”withdraw” or “send” option.
Simultaneously, you will want to open your Metamask extension and copy your Metamask’s public address by clicking on it. Return to the exchange and paste your Metamask’s public address in the form that asks you where you would like to send the Ethereum.
When choosing the amount of Ethereum you’d like to send to your Metamask, do not choose “Max”. Transactions on the blockchain require fees called “gas” every time you buy, sell, or transfer tokens. Because of this, you should reserve approximately $5 - $15 worth of Ethereum for fees when withdrawing tokens from exchanges such as Coinbase, Kraken, or Gemini.
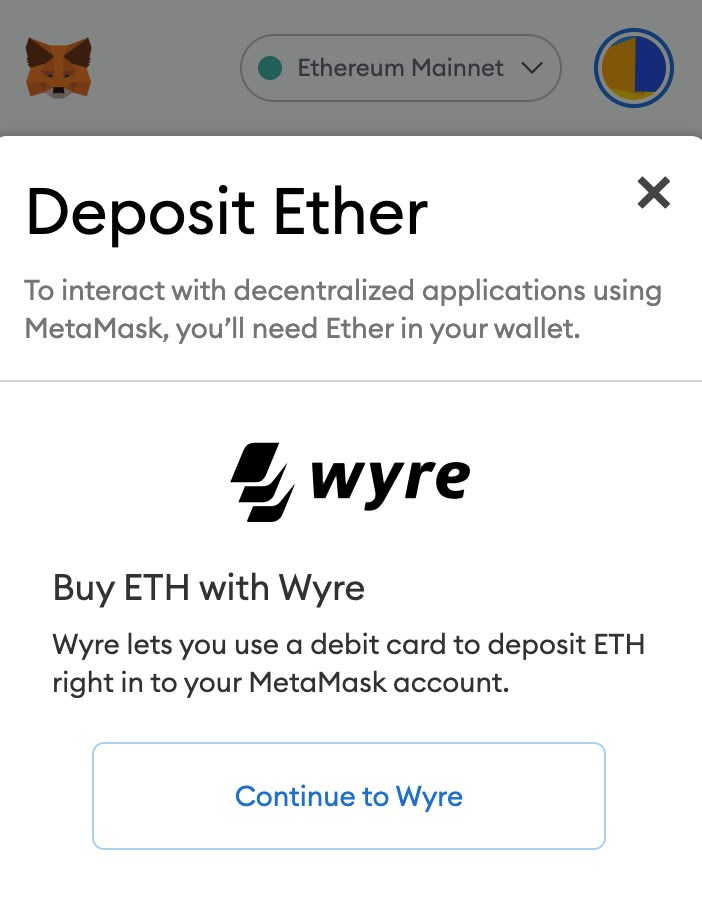
Purchasing Ethereum via Wyre
Another way to purchase Ethereum is directly within your Metamask, using Wyre. Purchasing Ethereum through Wyre will allow you to directly receive the funds into your wallet rather than buying and transferring them from an exchange. Wyre can be accessed by simply clicking “Buy” on your wallet's Assets page.
Within Wyre's purchasing interface, You will be prompted to enter the amount you’d like to purchase and your billing information. To purchase Ethereum through Wyre, you’ll need to use a debit card. Credit cards are not accepted.
Note that Wyre’s fees may vary from that of other exchanges. A detailed calculation of Wyre’s fees can be found on its website.
Buying NFTs
Once you’ve set up, explored, and funded your wallet, you can now connect your wallet to sites and mint NFTs like the NFT Tax Guide or even buy NFTs on secondary marketplaces like Opensea!
If you follow these steps and successfully fund your Metamask with Ethereum, you're now ready to purchase the NFT Tax Guide! Head over to nfttaxguide.com and click "mint" on the landing page. You will need to approve and sign the transaction on Metamask, wait for the transaction to process and confirm, and wallah, you now have access to the guide and the executive plan to Zendledgers tax software!
After you’ve purchased and collected the NFT Tax Guide, it will live inside your wallet but can be view the artwork and claim status on sites like OpenSea.